Nirupama Chandrasekhar | October, 2019
Contents
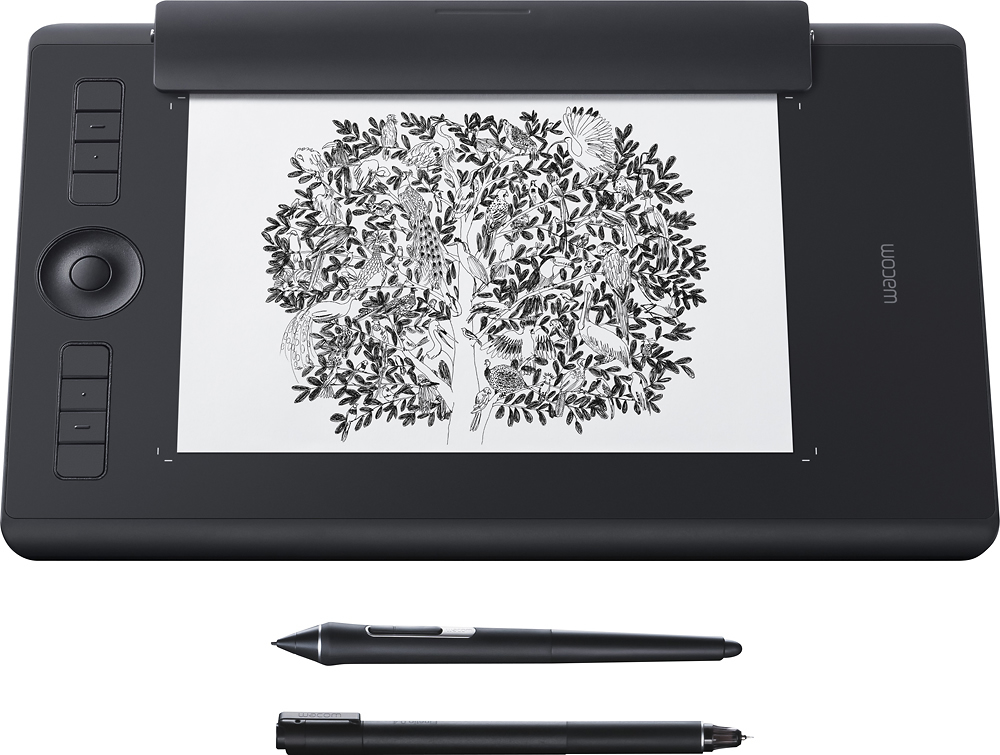
1 Wacom Intuos Pro Tablet
1 Wacom Pro Pen
1 Pen Stand
1 Finetip Ink Pen
1 Paper Clipper
1 USB Cable
1. Plug in the USB connector to the tablet, next to the Wacom logo, and plug the other end into your computer. Once the tablet is connected, a small blue light should light up behind the wheel button.

2. Grab the Wacom Pen and hover over the tablet surface. If the pen does not guide the mouse, and no software has been installed on your computer, go to this link, to download driver software. Make sure to download the correct driver for your operating system.

3. Accept Terms and Conditions, and follow the on-screen instructions to install the driver.

4. When installation is complete, configure Tablet and Pen settings as you would like on this screen.

5. When finished with Wacom tablet, make sure to press the power button on the side here.

NOTE: Paper Pro Mode only works with Wacom's app Inkspace. Install Inkspace from Wacom's website here, and follow onscreen directions before setting up the Paper Pro.
1. Attach the Paper Clipper to the Wacom Tablet carefully.

2. Clip a piece of paper to the paper clipper, over the surface of the Wacom Tablet. NOTE: Make sure that the piece of paper is only as large as the tablet surface, or not all of your drawing will transfer over.

3. Take out your Fine Tip Pen and uncap it. WARNING: This pen uses real ink. DO NOT use on the wacom surface without paper, or you will severely damage the tablet.

4. When the pen is uncapped, you will be able to use the Inkspace app to draw with the pen. Look for the green cross on the circular button to indicate that the Tablet has switched to Paper Pro mode.

5. Once you touch the pen to the surface of the paper, the green cross will turn blue. This means the Inkspace app is registering your drawing. If the cross does not turn blue, check that the Inkspace app is on, and that the pen sensitivity settings are properly calibrated.

6. To finish a drawing, press the button with the blue cross, to save the picture. The drawing WILL NOT appear onscreen before the button is pressed. The button should turn green once more. Go to the Inkspace Home Page, and your saved drawing will be there.

1. Open up Wacom Tablet Properties from your Applications list.
2. Under the heading: 'Tool', select the option 'Functions'.

3. This Express-Keys set-up is the default settings for the buttons. Under the headings: 'Express Keys', 'Touch Ring' and 'On-Screen Controls', you can change the layout of the Wacom tablet and assign different uses to each button, as necessary.

4. To change a setting, simply click on the scroll-down list, and find the settings you require. These hotkeys can range from different mouse click functions, opening up a specific app, or assigning a key from your keyboard to the Wacom buttons.

5. Exit the screen once finished.


The land on which we gather is the unceded territory of the Awaswas-speaking Uypi Tribe. The Amah Mutsun Tribal Band, comprised of the descendants of indigenous people taken to missions Santa Cruz and San Juan Bautista during Spanish colonization of the Central Coast, is today working hard to restore traditional stewardship practices on these lands and heal from historical trauma.
The land acknowledgement used at UC Santa Cruz was developed in partnership with the Amah Mutsun Tribal Band Chairman and the Amah Mutsun Relearning Program at the UCSC Arboretum.

 Santa Cruz, CA